Moormann Brothers 7-S Installation Instructions
INSTALLATION INSTRUCTIONS. MODEL 7-S
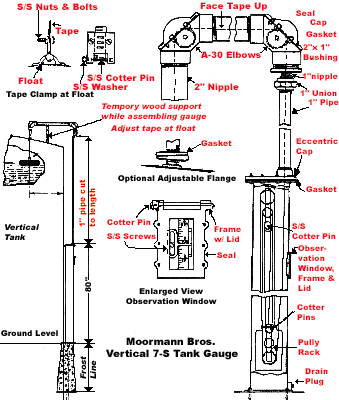
- Locate gauge position on ground - mark top edge of tank directly above ground location.
- Measure, out and thread 2" pipe (as marked on print).
- Use pipe dope on all connections.
- Assemble both A-30 elbows and 2" pipe as shown on print.
- Screw (1) elbow A-30 onto 2" pipe with reducing bushing, close nipple and union as shown on print; other A-30 elbow into 2" nipple in tank then screw other end of 2" pipe Into tank elbow, make straight with tank marking.
- Level 2" pipe, use temporary wood brace or alignment flange, if necessary. Secure brace to top of tank
- Set gauge housing with eccentric cap assembled on ground directly below overhanging elbow.
- Measure for 1 " pipe (reducing bushing In elbow to eccentric cap V-71 on gauge housing) allow for threads, cut and thread 1" pipe.
- Screw 1" pipe into elbow, then remove V-71 eccentric cap from housing and put on 1" pipe. CAUTION - Be sure eccentric cap Is straight and 1" outlet Is farthest away from tank.
- Fasten pulley rack with large pulley up to eccentric cap using stainless steel pins.
- Assemble other pulley rack in counterweights with large pulley down.
- Place counterweight on ground directly beneath eccentric cap pulley rack.
- Remove A-33 caps from both elbows.
- Thread tape from tank elbow with numbers up and clip ends first through 2" pipe and over elbow pulleys, down through 1" pipe and out eccentric cap, straight down and around bottom pulley. In C/W and up and over top pulley In eccentric cap, down to medium pulley up and over medium pulley down and around small pulley on CIW and up and around small pulley on eccentric cap, down and fasten to lug on counterweight pulley rack - use stainless steel pin. CAUTION - Do not thread tape over or under cross bars In pulley rack. Use caution - do not kink or bend tape.
- Fasten tape to float with tape clamp (as per print). CAUTION -Do not fasten tape clamp too tight as this may damage tape.
- Place eccentric cap gasket on housing top and insert counterweight assembly into housing. CAUTION -Do not allow C/W to drop or Jerk as this may cause damage to bearings, also be sure the tape is in groove of pulleys and not on the edge.
- Fasten outside housing to eccentric cap with observation window directly below 1" pipe.
- Place outside strand of tape over tape guide in observation window, CAUTION - Do not bend or kink tape and put ONLY ONE (1) strand of tape over the tape guide.
- If tank Is empty adjust tape reading at 1.3/8" (float draft), If it is partially full set reading exactly with stick, make major tape reading adjustments with the float by slipping tape through tape clamp. Minor adjustments (within 1" make with observation finger). DO NOT CUT OFF EXCESS TAPE UNTIL FINAL READING IS OBTAINED
- In setting the reading on the gauge, 1/2", 1/4" or even 1/8" is not close enough, be particular, set gauge to the exact amount of liquid in tank.
- CAUTION - Let float down in tank easily. Do not let it drop.
- Assemble observation frame and lid A-34 & A-38 place on housing, tighten for vapor.proofing.
- Fix base for housing either, concrete, wood post, or steel plate welded to tank, CAUTION - Do not weld gauge housing to tank.
- In most climates condensation forms inside the tank and gauge. A drain plug has been provided for draining at the bottom of the housing. In most climates this is necessary two times a year (spring and fall). However, in extreme cases draining is required more often.
Maintenance Instructions For All Models
The only maintenance necessary for perfect operation of the MOORMANN BROTHERS GAUGE is that the drain plug located It the bottom of the housing be opened 2 times a year (Fall and Spring) In normal climates. However, in severe climates opening may be required more often.
We have some precautionary measures that are listed in our Installation Instructions that If followed, will Insure perfect operation of our units. Some of these measures are listed below;
- Be sure gauge outlet on tank roof is plumb with the side of the tank.
- Be sure the 2" horizontal pipe (between the elbows) is level.
- Be sure the tape is in the pulley grooves.
- Be sure and thread the tape over the pulleys, and not over the cross bars in the pulley racks.
- Care should be used in handling the tape, do not bend, twist or kink as this will cause damage, also with a bad kink in the tape it will not travel over the pulleys properly.
- Pipe dope should be used on connections to insure vapor-proofing.
- Care should be used with the gasket, as broken gaskets will cause vapor loss
- For tank, with increased condensation build-up or corrosive fumes, we suggest filling the gauge housing with a lightweight clear oil such as Fuel oil or Mineral oil. This may be done by removing the elbow cap of the elbow assembly directly above the gauge housing, and adding the clear oil. A ball valve or petcock may be used to replace the drain plug In the housing in order to facilitate draining off the collected condensation. NOTE: THIS PROCEDURE MUST NOT BE USED IF OUR MODEL #AS-972 HIGH/LOW LEVEL ALARM SWITCH IS IN USE ON THE GAUGE! The alarm switch probe is to stay dry at all times. Anti-fog spray, which can be purchased from an automotive store, is also helpful In reducing the fog build-up on the Inside of the observation window glass, if the housing must remain dry due to the use of an alarm switch.
- By following the installation instructions carefully, the precision made and assembled parts of the gauge will give precision service.
Updated 1/5/21